An air powered caulking gun uses compressed air to push sealant or adhesive from a cartridge at a steady, controlled rate. Unlike manual guns that rely on hand pressure, pneumatic models deliver repeatable flow with less operator effort. Production managers, contractors, and factory maintenance teams prefer them for long or repetitive dispensing work.
But a pneumatic caulking gun will not perform well unless the air supply is set up correctly. Low pressure produces an uneven, slow bead. High pressure can burst the cartridge or splatter the material. This guide covers what PSI and CFM matter for air powered caulking guns, how to match a compressor, and how to adjust the regulator for different sealant types.
PSI Range for Air Powered Caulking Guns
Most air powered caulking guns operate between 40 and 100 PSI. The PSI rating determines how much force the air cylinder applies to push sealant through the nozzle.
Practical pressure ranges by material viscosity:
- Acrylic and latex caulk: 15 to 30 PSI. These materials flow easily. Higher pressure causes surging and a messy bead.
- Silicone and MS sealant: 40 to 70 PSI. Steady force for controlled flow without over-pressurizing the cartridge.
- Polyurethane and construction adhesive: 60 to 90 PSI. Thicker materials need more air pressure for consistent dispensing.
Check the maximum PSI rating on the gun before adjusting. Most pneumatic caulking guns list a maximum around 120 to 145 PSI. Exceeding this can blow out the back seal of a standard cartridge.
Matching a Compressor to an Air Caulking Gun
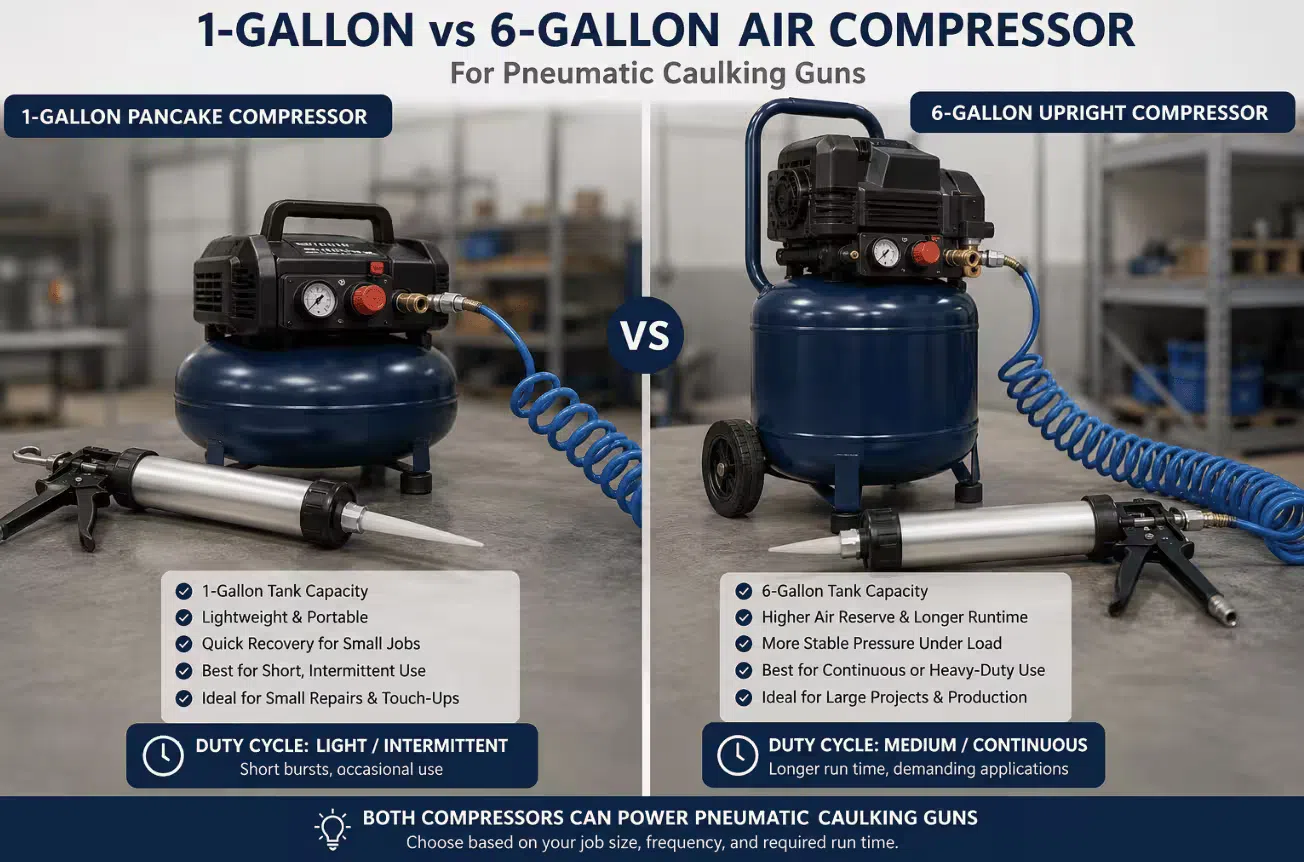
An air caulking gun needs enough air volume, measured in CFM, in addition to the right PSI. Most pneumatic caulking guns need a compressor that delivers 2 to 4 CFM at the operating pressure. A small pancake compressor with a 1-gallon tank works for short bursts but cycles frequently during continuous dispensing.
For a construction supplier or distributor recommending a complete setup, a practical minimum is a compressor with a 4- to 6-gallon tank and a regulator adjustable between 0 and 120 PSI. This setup handles a single air compressor caulking gun for window sealing, curtain wall work, or assembly line dispensing. Users running two or more guns need a larger compressor with higher CFM output.
Common user mistake: Buyers who do not already own a compressor often underestimate the total setup cost. A pneumatic caulking gun setup needs the gun, a compressor, an air hose of 25 to 50 feet, fittings, and a regulator. When the combined cost approaches cordless pricing, some buyers switch to battery-powered models instead. For B2B buyers who already have compressors in their facility, the pneumatic caulking gun remains the more cost-effective option.
Adjusting Pressure for Different Sealant Materials
Each sealant type behaves differently under air pressure. The correct setting depends on viscosity, cartridge size, and the job.
Silicone sealant: Set the regulator between 40 and 60 PSI. Lower the pressure for thin beads around windows and doors to avoid over-dispensing. An air silicone gun with a fine-tip nozzle helps maintain control at the lower end of this range.
Polyurethane and MS sealant: 50 to 75 PSI. These materials are tacky and resist flow more than silicone. Slightly higher pressure helps maintain steady output, especially in cooler weather when the material thickens.
Construction adhesive: 70 to 90 PSI. A compressed air caulking gun with a 600ml sausage pack barrel handles these materials well near the top of the recommended range.
Epoxy and two-part adhesives: A pneumatic applicator gun or pneumatic dispensing gun designed for dual cartridges needs a different pressure profile. Follow the epoxy manufacturer's recommendation, typically 60 to 90 PSI, and confirm that the gun's mixing ratio matches the cartridge size.
A pneumatic air caulking gun with a built-in flow regulator gives the operator more control when switching materials. Adjusting at the gun rather than at the compressor saves time when moving between silicone and polyurethane on the same job.
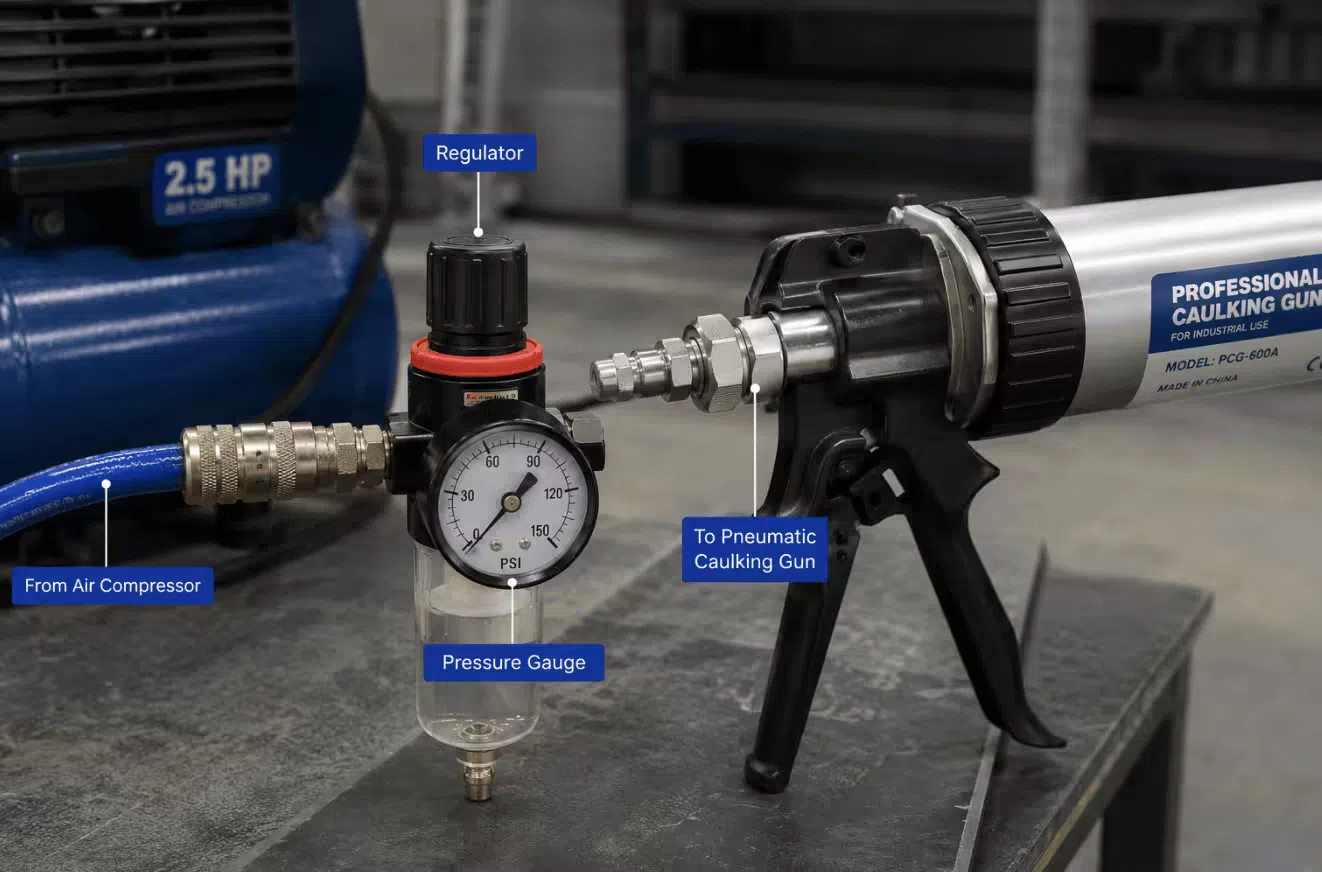
Pressure Regulator Setup
Without a regulator, the gun receives full tank pressure, typically 100 to 150 PSI — enough to burst most cartridges. Install an inline regulator close to the gun or use a gun with an integrated regulator.
Set the regulator at the starting pressure for the material, open the trigger briefly, and check the flow. Adjust upward in 5 PSI increments until the bead is consistent. A release valve near the gun lets the operator vent trapped air when adjusting or stopping, which prevents material from oozing after the trigger is released.
Regulator checklist for B2B buyers:
- Confirm the regulator range covers the gun's recommended PSI range
- Check that the regulator includes a pressure gauge with 5 PSI markings
- Verify fitting compatibility — 1/4-inch NPT is standard for pneumatic dispensing guns
Common Air Pressure Mistakes
Using too little pressure. An air powered caulking gun at 15 PSI with thick polyurethane adhesive dispenses slowly and unevenly. The operator pushes harder or holds the trigger longer, increasing fatigue and wasting material. Match pressure to material viscosity.
Using full compressor pressure without a regulator. A pneumatic caulking gun connected directly to a compressor at 120 PSI over-pressurizes a standard cartridge within seconds. The back of the tube blows out, material is wasted, and the job stops.
Choosing a compressor with too small a tank. A 1-gallon compressor runs constantly during continuous dispensing. The motor overheats and pressure drops mid-bead. For production work or industrial assembly, a 6-gallon or larger tank is standard.
FAQ
How does a sealant gun work? A sealant gun holds a cartridge of sealant or adhesive and uses a plunger to push material out through a nozzle. In an air powered sealant gun, compressed air drives the plunger instead of hand pressure, providing consistent flow over long runs.
What is the difference between a pneumatic sealant gun and an air powered caulking gun? These terms describe the same tool type. Pneumatic sealant gun and air powered caulking gun are often used interchangeably. Some suppliers list pneumatic sealer gun for epoxy or aircraft-grade applications, but the operating principle is the same.
What PSI should I use for silicone with a pneumatic caulking gun? 40 to 60 PSI is standard. Start at 40 PSI and increase in 5 PSI steps if the flow is too slow for the bead size you need.
Can I use a pneumatic caulking gun with a small home compressor? A small compressor with a 1- to 2-gallon tank works for short bursts. For continuous production work, curtain wall installation, or industrial assembly, a 4- to 6-gallon compressor with 2 to 4 CFM at the operating PSI is more practical.
What is a pneumatic sealant gun price range for wholesale buyers? B2B wholesale pricing varies by model, barrel size, and OEM requirements. Buyers sourcing from a caulking gun manufacturer typically receive bulk pricing, private-label packaging, and specification support. Contact the supplier with your market details and order volume for a quotation.
Do I need a special nozzle for high-pressure dispensing? Standard plastic nozzles work for most sealants at up to 90 PSI. For thick construction adhesive or epoxy at high pressure, metal mixer nozzles or reinforced tips reduce the risk of splitting.
Conclusion
The PSI and CFM setup determines how well a pneumatic caulking gun performs on the job. Match pressure to material viscosity, confirm the compressor delivers enough air volume, and always use a regulator between the compressor and the gun.
For B2B buyers sourcing air powered applicator guns for wholesale, OEM, or distribution, the models on our product page include single-component guns for cartridges and sausage packs, and dual-component pneumatic applicator guns for epoxy and two-part adhesives. Review the specifications and contact our team for bulk pricing, OEM configuration, and air pressure matching support.