Whether you are sealing expansion joints on a construction site, installing window and door frames, or training a new crew on sealant application, knowing how to use a caulking gun properly is a skill every trade worker needs. A caulking gun, sometimes called a caulk gun or sealant gun, is one of the most common tools on any job site, yet many users struggle with uneven beads, wasted material, and messy results.
This guide walks you through every step, from understanding the tool itself to loading, applying, and maintaining it. If you have never used a caulking gun before, or if you want to improve your technique, this article covers everything you need.
What Is a Caulking Gun and Why Do You Need One?
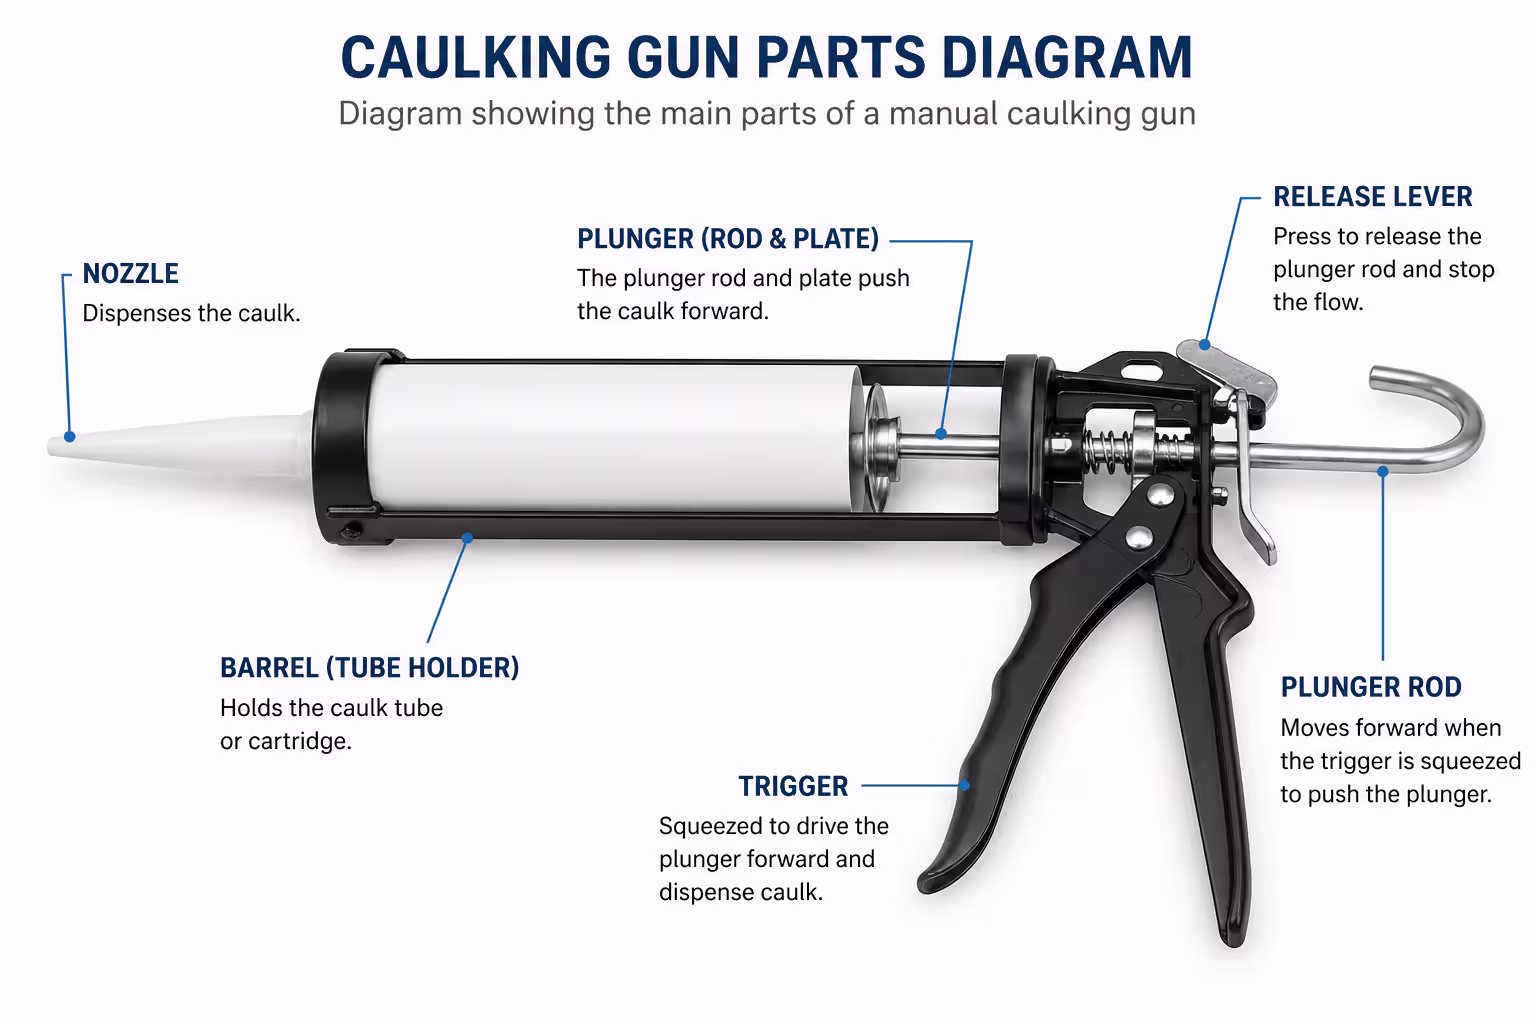
A caulking gun is a handheld tool designed to dispense sealant, adhesive, or caulk from a cartridge or tube. It works by pushing a plunger into the back of the cartridge, which forces the material out through the nozzle at a controlled rate.
On construction and trade sites, caulking guns are used for:
- Construction sealing: Filling gaps in concrete, masonry, and precast joints
- Window and door installation: Sealing frames against water and air infiltration
- Waterproofing: Applying silicone or polyurethane sealant in wet areas
- Adhesive dispensing: Applying construction adhesives for bonding materials
- General maintenance and repair: Sealing cracks, gaps, and joints in buildings
For professional applications, the quality of the caulking gun directly affects the consistency of the sealant line, the speed of application, and the amount of material wasted. A poorly made gun can lead to uneven dispensing, hand fatigue, and frequent rework, all of which cost time and money on the job site.
If you are sourcing tools for a crew or supplying customers who work in construction, choosing professional caulking guns with a reinforced frame and smooth thrust rod makes a noticeable difference in daily productivity.
Types of Caulking Guns You Should Know
Before you learn how to use a caulk gun, it helps to understand the main types available. While this guide focuses on manual caulking guns, here is a quick overview.
Manual Caulking Guns
Manual caulking guns are the most common type on construction sites. They are lightweight, require no power source, and are suitable for most sealant and adhesive applications.
Within manual guns, there are two main drive mechanisms:
- Ratcheting type: The trigger clicks into positions, advancing the plunger in small increments. This is the most affordable option but can result in slightly less smooth dispensing.
- Smooth rod type: The plunger moves forward continuously as you squeeze the trigger. This provides a more consistent bead and is preferred for precision work.
Pneumatic and Electric Caulking Guns
Pneumatic caulking guns use compressed air and are common in high-volume industrial settings. Electric caulking guns offer powered dispensing for repetitive tasks.
For most construction and trade applications, a manual caulking gun for construction use is the practical choice: no batteries, no air lines, just reliable performance.
Caulking guns also come in different cartridge capacities, most commonly 310ml and 600ml. The 310ml size is standard for sealant cartridges used in construction and trade supply across most markets.
What You Need Before Using a Caulking Gun
Before you start, gather the following:
- Caulk cartridge: Choose the right sealant type for your application, such as silicone, acrylic, polyurethane, or hybrid sealant
- Utility knife or scissors: For cutting the nozzle tip
- Painter's tape: For masking clean edges along the joint
- Damp cloth or sponge: For smoothing the bead and cleaning up
- Nail, wire, or puncture tool: For piercing the inner seal of the cartridge
Choosing the right sealant matters as much as choosing the right gun. Silicone sealant is flexible and waterproof, making it ideal for wet areas and exterior joints. Acrylic caulk is paintable and easier to clean, suitable for interior trim and decoration. Polyurethane sealant offers strong adhesion for concrete and masonry applications.
For trade buyers and distributors, caulking guns compatible with various sealant types give end users more flexibility across different job-site requirements, which reduces the number of tools crews need to carry.
How to Load a Caulking Gun Step by Step
Loading a caulk gun correctly is the first step to a clean application. Here is how to do it.
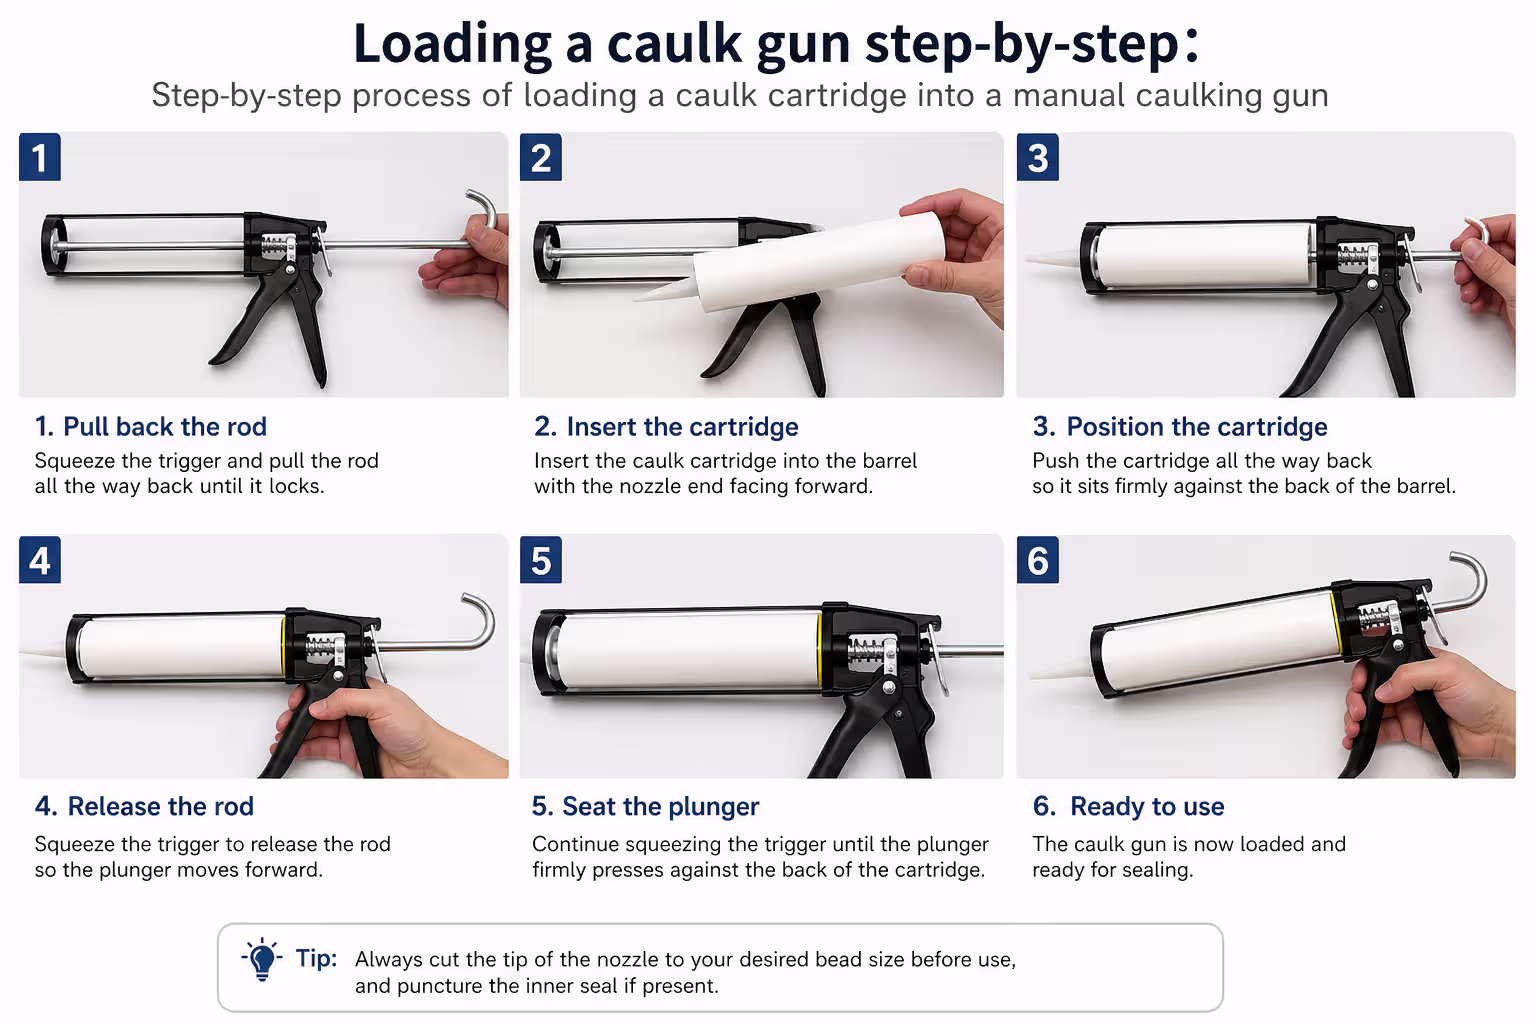
Step 1: Open the Gun
Hold the caulking gun in one hand. With your thumb, press the release lever located at the back of the gun near the trigger. This retracts the plunger rod, creating space for the cartridge.
Step 2: Insert the Cartridge
Place the caulk cartridge into the frame with the nozzle end facing forward. Make sure the cartridge sits flush and is properly aligned.
Step 3: Push the Plunger Forward
Release the lever and push the plunger rod forward until it contacts the back of the cartridge. The plunger should sit snugly against the cartridge's piston.
Step 4: Cut the Nozzle Tip
Using a utility knife, cut the nozzle tip at a 45-degree angle. The size of the opening determines the bead width. Cut closer to the tip for a thin bead, or further back for a wider one.
Step 5: Puncture the Inner Seal
Most cartridges have an inner foil or plastic seal behind the nozzle. Use a long nail, a piece of wire, or the puncture tool on your caulk gun to break through this seal. If you skip this step, no material will come out.
Common Mistakes When Loading a Caulk Gun
- Not cutting the nozzle at an angle: A straight cut makes it harder to control the bead direction.
- Forgetting to puncture the inner seal: The gun will feel like it is working, but nothing comes out.
- Not seating the plunger properly: If the plunger does not contact the cartridge piston, you will get inconsistent pressure and the cartridge may slip.
How to Use a Caulking Gun: Step-by-Step Application
Now that the gun is loaded, here is how to use a caulking gun to apply sealant cleanly and efficiently.
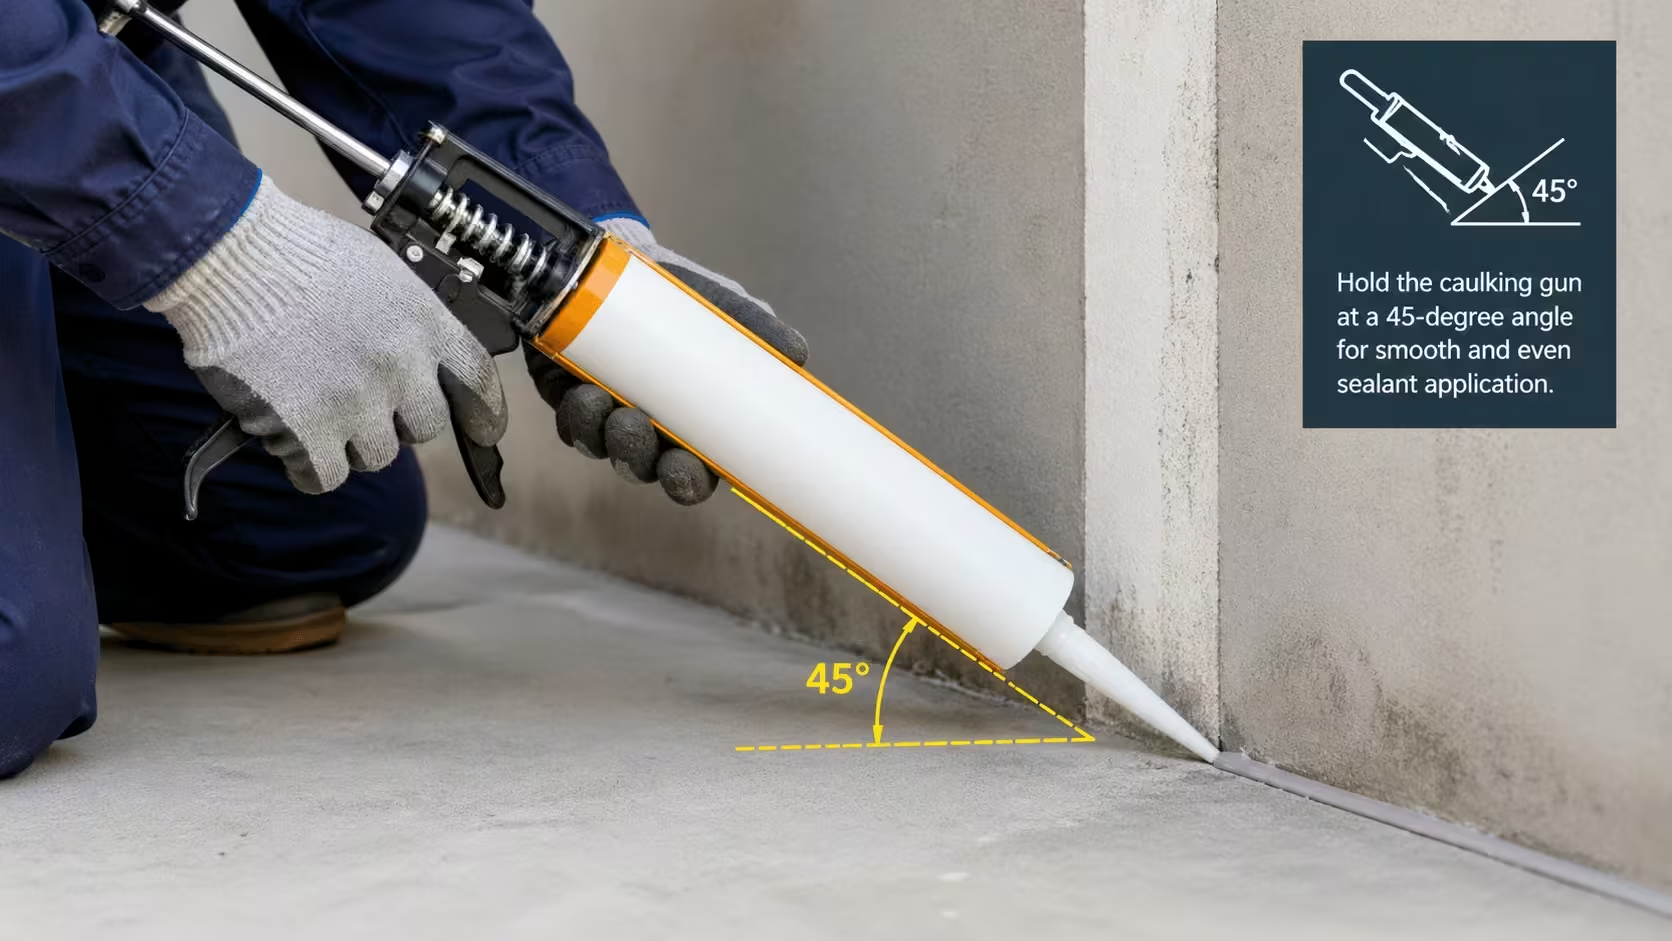
Step 1: Position the Gun at a 45-Degree Angle
Hold the caulking gun so the nozzle tip sits at a 45-degree angle to the joint you are sealing. This angle allows the sealant to fill the gap evenly.
Step 2: Squeeze the Trigger with Even Pressure
Apply steady, consistent pressure on the trigger. Each squeeze advances the plunger and pushes sealant out through the nozzle.
Avoid squeezing too hard. The goal is a controlled, continuous flow.
Step 3: Move the Gun Steadily Along the Joint
As you squeeze the trigger, pull or push the gun along the joint at a consistent speed. Keep the nozzle in contact with the joint edges.
The speed of your movement determines the bead size. Slower movement means more material, while faster movement means less.
Step 4: Release the Trigger and Engage the Thumb Lock
When you reach the end of a section or need to stop, release the trigger. On most manual caulking guns, you can flip the thumb lock or push the ratchet release to stop the plunger from continuing to push material out.
This prevents dripping and waste.
Step 5: Smooth the Bead
Immediately after application, smooth the bead using a finishing tool, a caulk finishing spatula, or a wet finger. This presses the sealant into the joint and creates a clean, professional finish.
Wipe excess material with a damp cloth.
For trade crews handling multiple joints per day, using a caulking gun with consistent dispensing pressure, such as a smooth rod model, reduces rework and keeps bead quality uniform across the project.
Tips for a Smooth, Professional Caulk Line
- Maintain a steady speed. Stopping and starting creates blobs and uneven lines.
- Use painter's tape on both sides of the joint for clean, sharp edges.
- Keep a damp cloth nearby to wipe the nozzle tip between sections.
- For long joints, work in manageable sections of 30–60 cm at a time.
- Apply a finishing tool or wet finger in a single, continuous stroke.
How to Use a Caulking Gun with Silicone Sealant
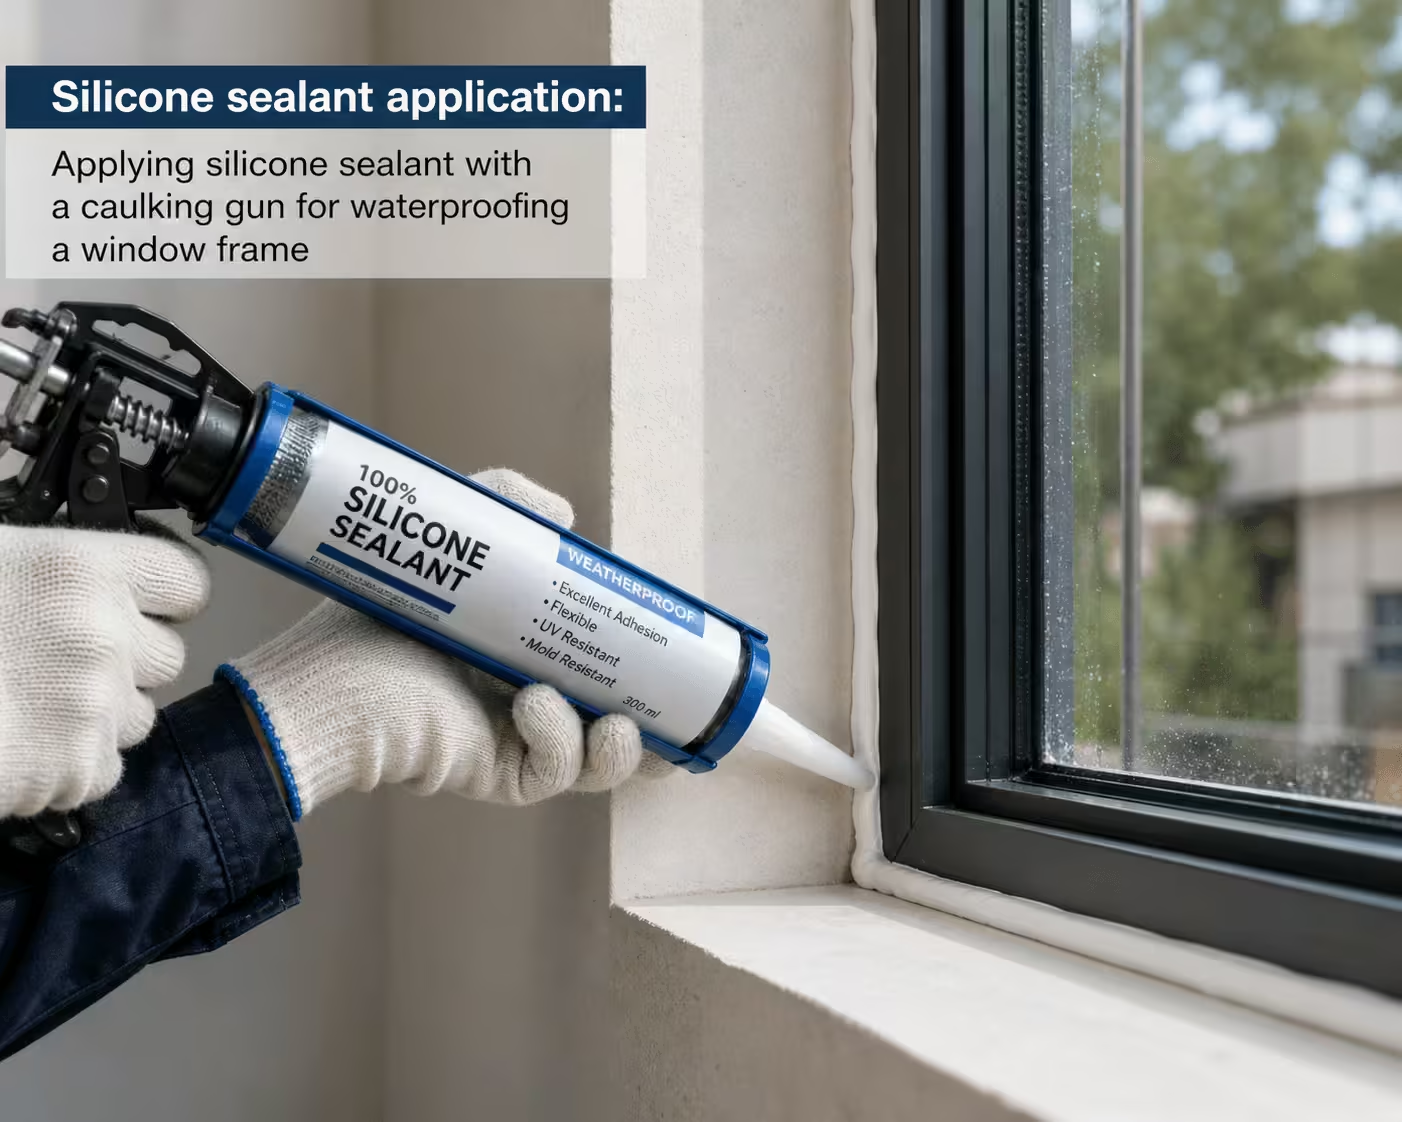
Silicone sealant is one of the most common materials dispensed with a caulking gun, especially in construction and waterproofing applications. If you want to know how to use a caulk gun with silicone, there are a few specific points to keep in mind:
- Silicone cures with moisture: It begins to skin over within 10–20 minutes, so you need to smooth the bead quickly after application.
- Silicone is not paintable: If you need a paintable finish, choose acrylic or hybrid sealant instead.
- Clean surfaces are critical: Silicone adheres poorly to dusty or greasy surfaces. Wipe the joint with a solvent or cleaning solution before application.
- Use the right nozzle size: Silicone joints in construction are typically 5–10mm wide, so cut the nozzle accordingly.
For distributors and wholesalers supplying sealant to construction markets, ensuring that your caulking guns work reliably with silicone sealant is essential because silicone is a high-volume sealant category in many regions.
Caulking Gun Tips for Beginners
If this is your first time using a caulking gun, here are some practical tips to get better results from the start:
- Practice on scrap material first: Before working on the actual project, practice on a piece of cardboard or scrap to get a feel for the trigger pressure and speed.
- Start with a smaller opening: You can always cut more off the nozzle, but you cannot put it back. Start with a small opening and increase if needed.
- Control the bead size with speed: Moving slower deposits more material, while moving faster deposits less. Find the right balance for your joint width.
- Wear gloves: Silicone and polyurethane sealants are difficult to remove from skin.
- Work in ventilated areas: Some sealants release fumes during application and curing.
For procurement managers sourcing caulking guns for crews with mixed experience levels, choosing a gun with ergonomic grip design and smooth trigger action helps reduce the learning curve for new users.
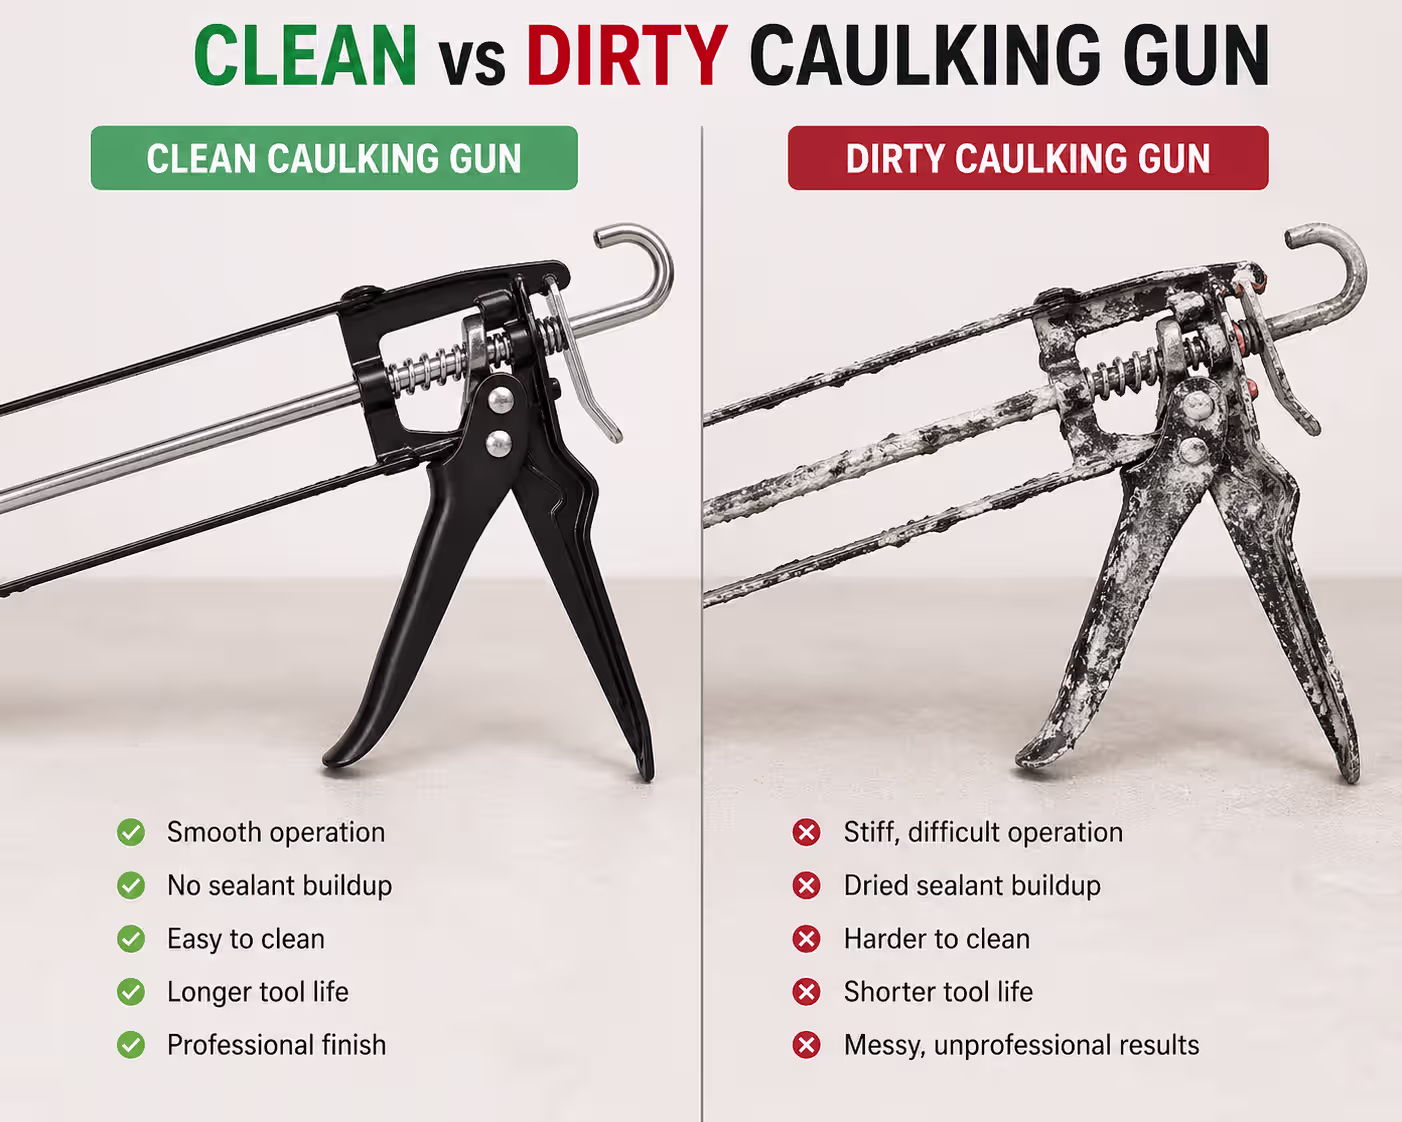
How to Clean and Maintain Your Caulking Gun
A caulking gun that is cleaned and maintained properly will last significantly longer, which matters when you are buying tools in bulk for a team or supplying them to customers.
- Clean after every use: Wipe the nozzle, plunger tip, and frame with a damp cloth before the sealant cures.
- Remove cured sealant: If sealant has hardened on the gun, use a utility knife or stiff brush to scrape it off.
- Check the release lever: Make sure the release lever moves freely and the plunger retracts smoothly.
- Store in a dry place: Moisture can cause corrosion on metal parts over time.
- Inspect the thrust rod: A bent or worn rod will cause uneven dispensing and should be replaced.
For wholesalers and distributors, the durability of the caulking gun directly affects end-user satisfaction and repeat orders. Guns with a reinforced frame and corrosion-resistant components hold up better under daily job-site use.
Frequently Asked Questions About Using Caulking Guns
How do you use a caulking gun for beginners?
Hold the gun at a 45-degree angle to the joint, squeeze the trigger with even pressure, and move the gun steadily along the gap. Smooth the bead immediately with a finishing tool or wet finger. Practice on scrap material first to get comfortable with the trigger pressure and movement speed.
How do I make my caulk gun work?
If your caulk gun is not dispensing material, check three things: make sure the plunger is seated against the cartridge piston, confirm you have punctured the inner seal of the cartridge, and verify the release lever is fully engaged so the ratchet or rod can advance.
What does the caulk gun release lever do?
The release lever retracts the plunger rod, which allows you to load or remove a cartridge. It also stops the plunger from continuing to push material when you release the trigger, preventing dripping and waste.
Do you push or pull a caulking gun?
Most users pull the caulking gun toward them along the joint, but the direction depends on the application. The important thing is to maintain a consistent angle and speed, regardless of whether you push or pull.
Why is my caulking gun hard to squeeze?
A hard-to-squeeze caulk gun can be caused by a high thrust ratio, cold sealant, a partially cured cartridge, or a binding thrust rod. Warming the cartridge to room temperature and checking the rod for smooth movement usually helps.
What thrust ratio should I choose?
For standard sealant cartridges such as silicone and acrylic, a thrust ratio of 12:1 to 18:1 is sufficient. For thicker materials like polyurethane or construction adhesive, choose a ratio of 22:1 or higher. The right ratio depends on the material viscosity you are dispensing most often.
Can I use a caulking gun for silicone sealant?
Yes. Silicone sealant is one of the most common materials dispensed with a manual caulking gun. Make sure the gun fits the cartridge size, typically 310ml, and has enough thrust ratio for the sealant viscosity.
Choose Reliable Caulking Guns for Daily Sealant Work
Learning how to use a caulking gun is straightforward once you understand the loading process, the correct application technique, and the importance of consistent pressure and speed. Whether you are sealing expansion joints on a large construction project, training a new crew, or supplying tools to customers, the basics covered in this guide apply across all manual caulking gun applications.
The quality of the tool matters as much as the technique. A caulking gun with a smooth thrust rod, ergonomic handle, and reliable release lever makes every application easier and more consistent. This helps reduce material waste, rework, and hand fatigue across long working hours.
If you are looking to compare manual caulking gun models, request samples, or discuss OEM packaging for your market, contact us to find the right fit for your business.