A caulking gun that stops working mid-job costs time, wastes sealant, and on a construction site, it can delay an entire crew. Whether the caulk is not coming out, the trigger feels stuck, or material keeps dripping after you release pressure, the problem usually comes down to one of these common causes.
This guide walks you through each issue step by step, so you can diagnose the problem and decide whether to fix or replace the tool. If you are still learning the basics of sealant application, check our guide on how to use a caulking gun first.
Quick Reference: Common Caulking Gun Problems
| Problem | Likely Cause | Quick Fix |
|---|---|---|
| Caulk not coming out | Clogged nozzle, unpunctured inner seal, or expired sealant | Clear nozzle, puncture inner foil seal, or replace cartridge |
| Hard to squeeze | Low thrust ratio, bent rod, or lack of lubrication | Match thrust ratio to sealant viscosity; lubricate mechanism |
| Keeps dripping | No pressure release mechanism | Use a gun with auto-reverse feature; twist cartridge as workaround |
| Trigger or release lever stuck | Broken spring, loose pivot, or cracked frame | Replace spring, tighten pivot, or replace the gun |
| Plunger jammed or won't retract | Sealant buildup on rod or bent rod | Clean rod with penetrating oil; replace if bent |
Why Do Caulking Guns Stop Working? Common Causes at a Glance
When a caulking gun fails on the job site, the root cause usually falls into one of these categories:
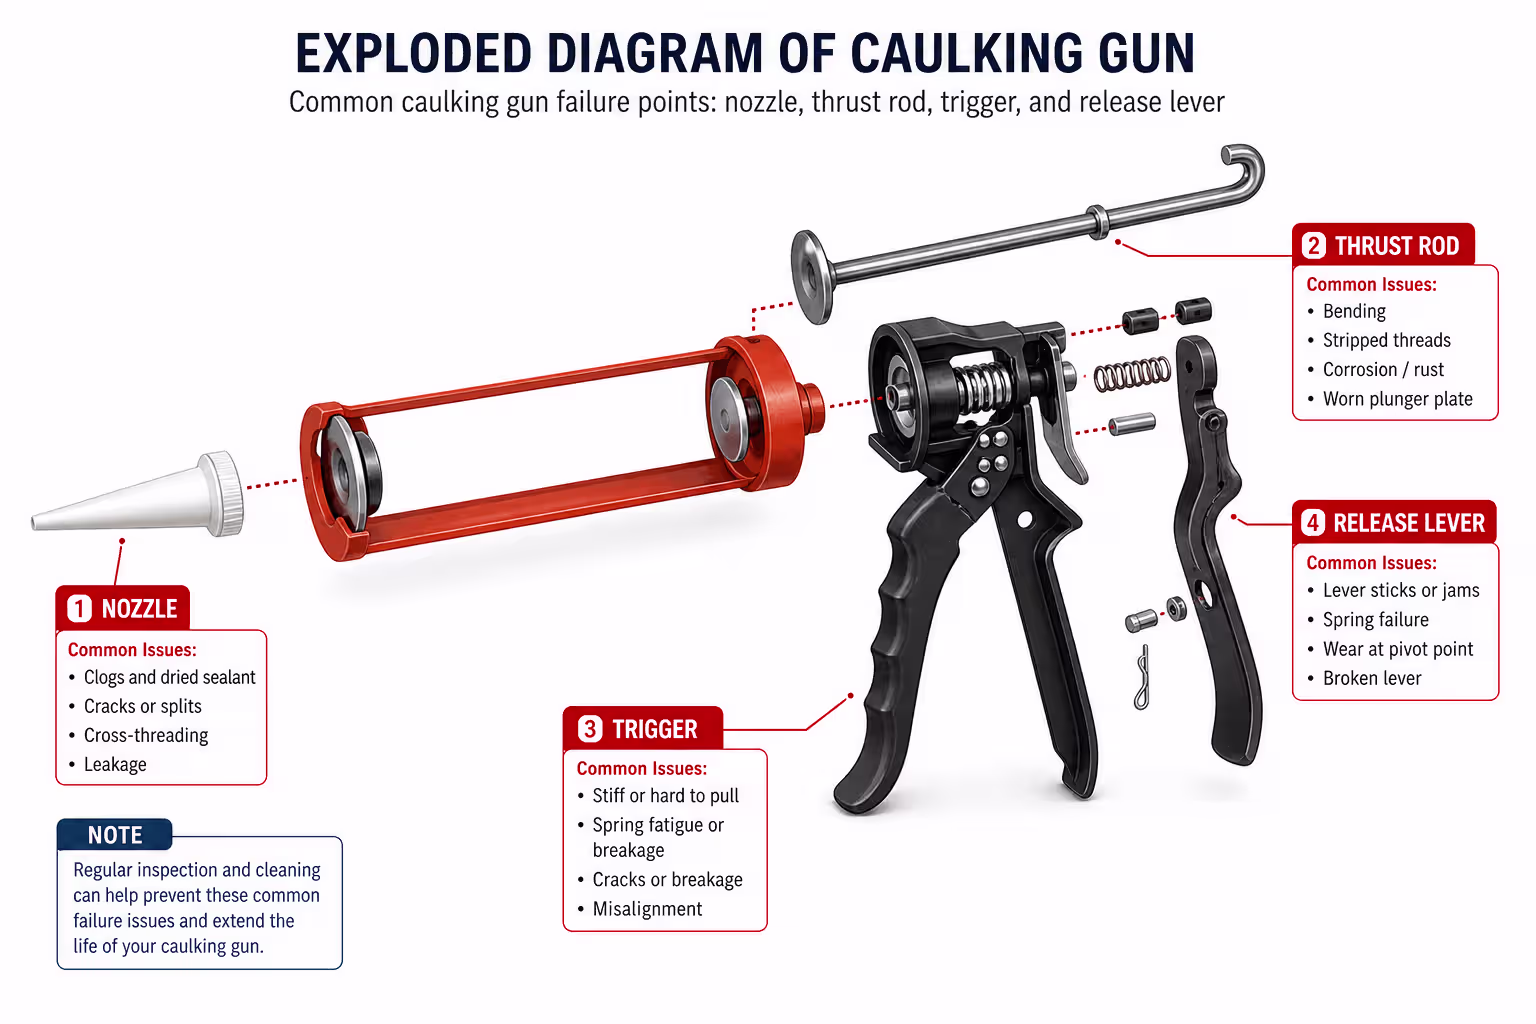
- Clogged nozzle — dried sealant blocks the tip, preventing any material from exiting
- Plunger or thrust rod jam — the internal rod that pushes the cartridge gets stuck or bent
- Insufficient thrust ratio — the gun lacks the mechanical advantage needed for thicker sealants
- No pressure release mechanism — the gun continues to ooze material after you stop squeezing
- Trigger or release lever failure — worn springs, loose pivots, or cracked frames cause mechanical breakdown
Some of these problems are quick fixes. Others point to a tool that has reached the end of its service life. For construction crews and trade professionals, knowing the difference helps you decide whether to repair or replace — and avoid repeated downtime on the job site.
Tip: If your gun is under six months old and already showing multiple issues, the tool quality itself is likely the problem. Budget guns with thin steel frames and low thrust ratios tend to fail faster under daily job-site conditions.
Problem 1: Caulk Is Not Coming Out of the Gun
This is the most common complaint: you squeeze the trigger, but no sealant comes out. If your caulk gun is not dispensing, work through these checks in order.
Step 1 — Check the nozzle
Remove the cartridge cap and look at the nozzle tip. Sealant dries quickly once exposed to air. Even a thin skin of cured material inside the nozzle opening can block flow completely.
Step 2 — Check the inner foil seal
Pull the cartridge out of the gun. Look inside the nozzle opening — most cartridges have an inner foil seal behind the nozzle that needs to be punctured before use. Pierce it with a long nail, wire, or the built-in puncture tool if the gun has one. Without puncturing this seal, the gun cannot push material through.
Step 3 — Check the plunger alignment
Slide the plunger rod forward manually. If it does not move smoothly or feels crooked, the rod may be bent. A bent thrust rod cannot maintain consistent pressure against the cartridge, which results in uneven or zero dispensing.
Step 4 — Check the cartridge orientation
It sounds basic, but on a busy site with multiple crew members sharing tools, cartridges sometimes get loaded backwards. The nozzle end should face the front of the gun. The flat bottom of the cartridge should sit against the plunger.
Step 5 — Check the sealant expiry date
Old or improperly stored sealant can cure inside the tube before you even open it. If the cartridge feels hard or the plunger will not advance at all despite correct installation, the sealant itself may be the issue. For distributors, this is worth noting — sealant stored in hot warehouses degrades faster, and end users may blame the tool when the product is the problem.
A caulking gun with a smooth, reinforced thrust rod reduces the risk of plunger jams and misalignment — especially under heavy daily use on construction sites.
How to Unblock a Caulking Gun Nozzle
If the nozzle is clogged, you have a few options:
- Insert a long nail, wire, or a thin Allen key into the nozzle opening to break through the dried sealant plug
- Cut the nozzle tip at a 45° angle with a utility knife, further back from the clogged point — this also widens the bead for larger joints
- For stubborn clogs, unscrew or pull off the nozzle entirely. For uncured residue, follow the sealant manufacturer's cleaning instructions. Water may help with some water-based products, while mineral spirits may help with some uncured silicone residue. Fully cured silicone usually needs to be removed mechanically.
To prevent future clogs, always wipe the nozzle tip with a damp cloth after each use and store the cartridge nozzle-down in a sealed plastic bag between jobs.
Problem 2: The Caulk Gun Is Hard to Squeeze
If the trigger is difficult to press or the handle feels stiff, the issue is usually mechanical. A caulk gun that is hard to squeeze wastes energy, slows down your crew, and leads to inconsistent bead quality.
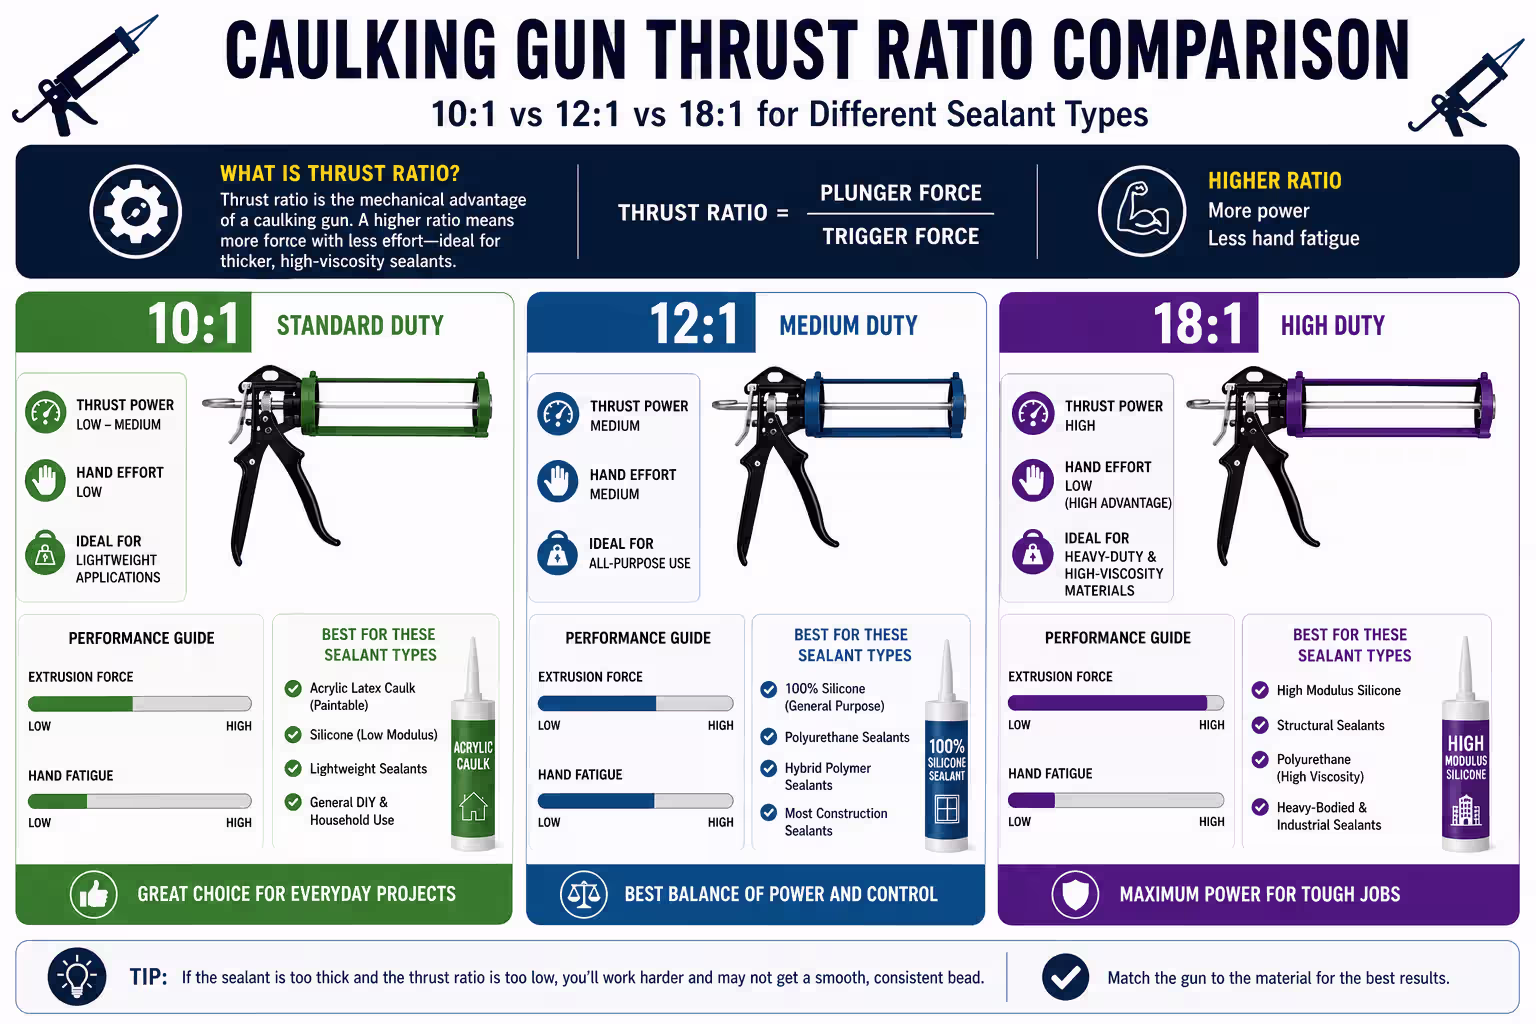
Cause 1 — Thrust ratio is too low
Every caulking gun has a thrust ratio — the mechanical advantage the trigger mechanism provides. A 10:1 ratio works fine for thin sealants and acrylic caulk. For higher-viscosity materials such as polyurethane sealant, butyl, or some construction adhesives, a higher thrust ratio may be needed. Many professional guns use ratios such as 12:1, 18:1, or higher depending on the material. If you are using a low-ratio gun with a thick product, squeezing will feel extremely stiff.
Cause 2 — The thrust rod is bent or corroded
A bent rod drags against the barrel of the gun, creating friction. Corrosion from moisture exposure produces the same effect. Both problems get worse over time.
Cause 3 — Internal mechanism needs lubrication
The ratchet teeth and piston assembly inside the gun need occasional lubrication. Without it, metal-on-metal contact increases resistance with every squeeze.
Cause 4 — Poor tool design
Some budget guns simply are not built for sustained use. Thin handles dig into your palm, and the trigger geometry forces your fingers into an awkward angle. After a few hours of continuous sealing work, hand fatigue becomes a real problem — especially for crews applying sealant across large expansion joints or curtain wall installations.
If your team regularly works with heavier sealants, consider switching to caulking guns with higher thrust ratios. A higher ratio means less force per squeeze, which translates to less fatigue and more consistent output over a full workday.
Problem 3: Caulk Keeps Dripping After You Stop Squeezing
You release the trigger, but sealant continues to ooze out of the nozzle. This dripping wastes material, creates mess, and on a finished surface, it can mean hours of cleanup.
Why it happens
Standard caulking guns maintain constant forward pressure on the cartridge, even after you stop pulling the trigger. The residual pressure in the tube forces sealant out through the nozzle until it slowly equalizes. This is normal behavior for basic guns — but it can be reduced.
The fix — Pressure release mechanism
A dripless or auto-reverse caulking gun includes a spring-loaded mechanism that slightly retracts the thrust rod when you release the trigger. This releases the pressure inside the cartridge and helps reduce dripping significantly. However, the effectiveness depends on sealant viscosity, nozzle opening size, and temperature — no mechanism eliminates dripping completely in all conditions. If your current gun does not have this feature, there is no way to retrofit it — you need a different tool.
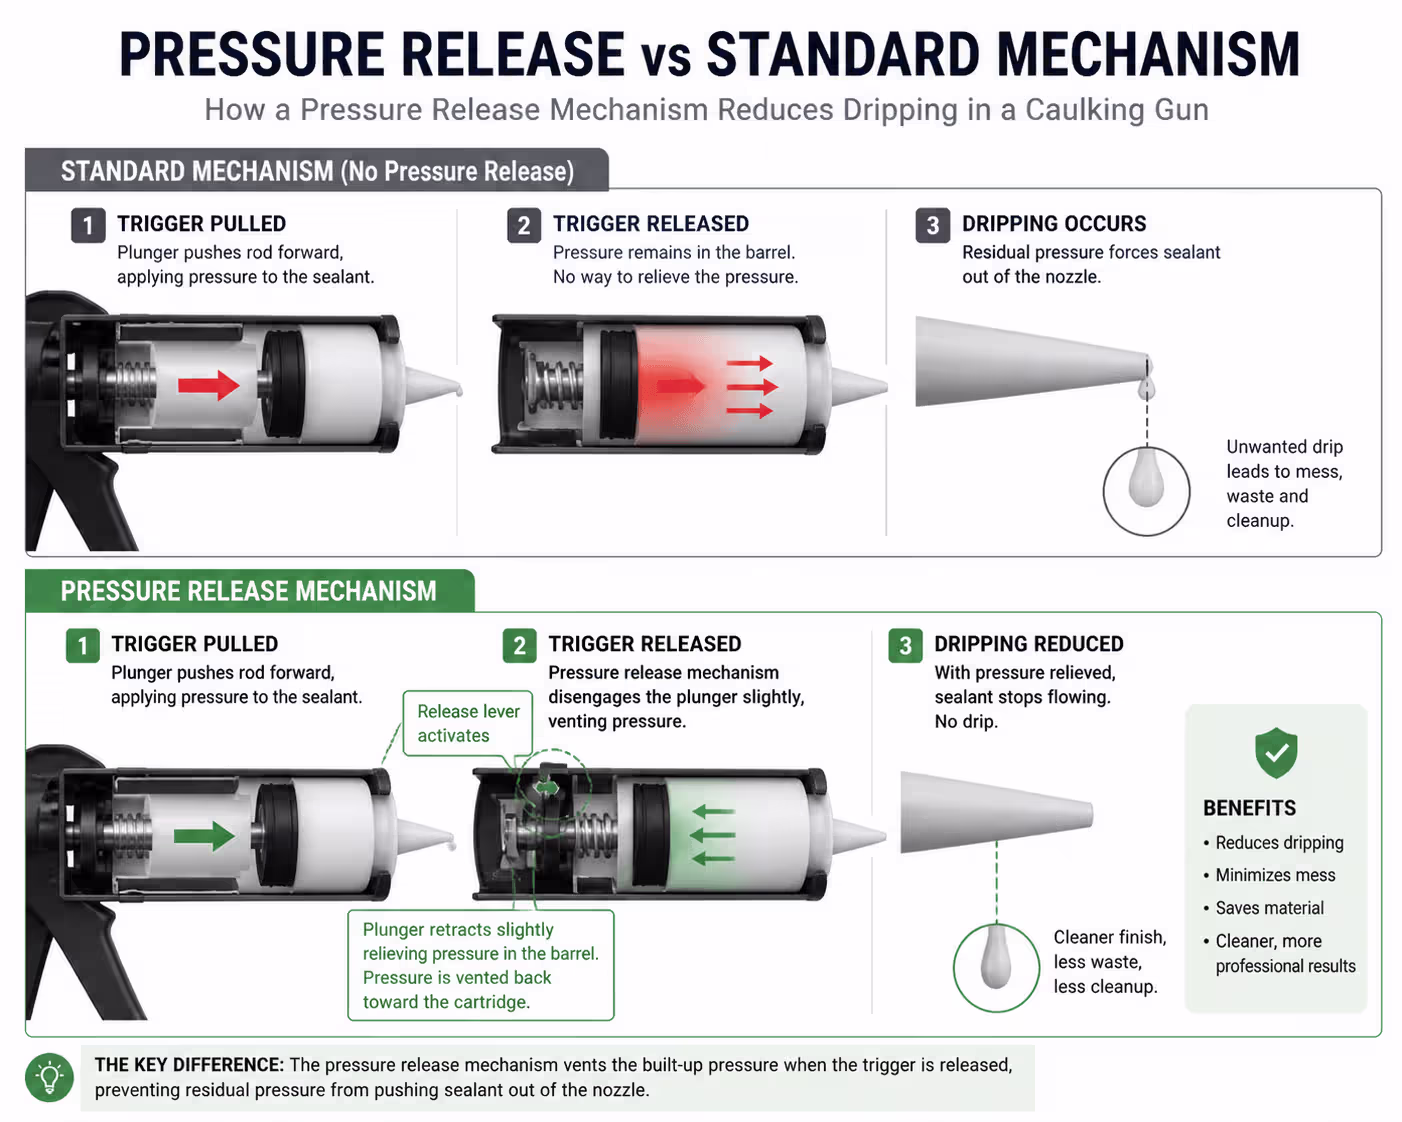
Temporary workarounds
- Twist the cartridge slightly after each bead to break the sealant flow
- Press a piece of painter's tape over the nozzle tip between applications
- Keep a rag or bucket nearby to catch drips during pauses
For professional applications where clean lines and minimal waste matter — window installation, curtain wall sealing, visible expansion joints — a gun without a pressure release function can cost more in cleanup time and wasted sealant than the price difference of upgrading. On commercial projects where material costs add up across hundreds of linear meters of joint, reducing drip also means less sealant waste per job. Look for caulking guns with a pressure release mechanism if dripping is a recurring problem.
Problem 4: The Trigger or Release Lever Is Not Working
When the trigger feels loose, the release lever will not engage, or the plunger does not advance when you squeeze, you are dealing with a mechanical failure in the trigger assembly.
Common causes
- Release lever spring broken. The small spring inside the release lever mechanism can snap after repeated use. When this happens, the lever either stays locked, meaning the plunger will not advance, or stays disengaged, meaning the plunger slides forward freely.
- Trigger rivet or pivot point is loose. The trigger connects to the internal ratchet mechanism through a pivot point. If this rivet loosens, the trigger moves but does not engage the ratchet teeth properly.
- Frame crack near the trigger area. Thin stamped-steel or zinc-alloy frames can crack near the trigger housing, especially under heavy use. Once the frame flexes, the trigger mechanism loses alignment.
Simple fixes
- If the release lever spring is broken, some models allow spring replacement. Check if your gun has a replaceable spring assembly.
- A loose pivot rivet can sometimes be tightened with pliers or a small hammer.
- If the frame itself is cracked, the gun needs to be replaced — there is no reliable field repair for a cracked frame.
How the Caulking Gun Trigger Mechanism Works
Understanding the internal mechanism helps you diagnose problems faster. A manual caulking gun uses a ratchet-and-pawl system:
- When you squeeze the trigger, a pawl, which is a small metal tooth, catches the teeth on the thrust rod and pushes it forward one notch.
- When you release the trigger, the pawl holds the rod in place while the trigger resets.
- When you press the release lever, the pawl disengages, and you can pull the thrust rod backward.
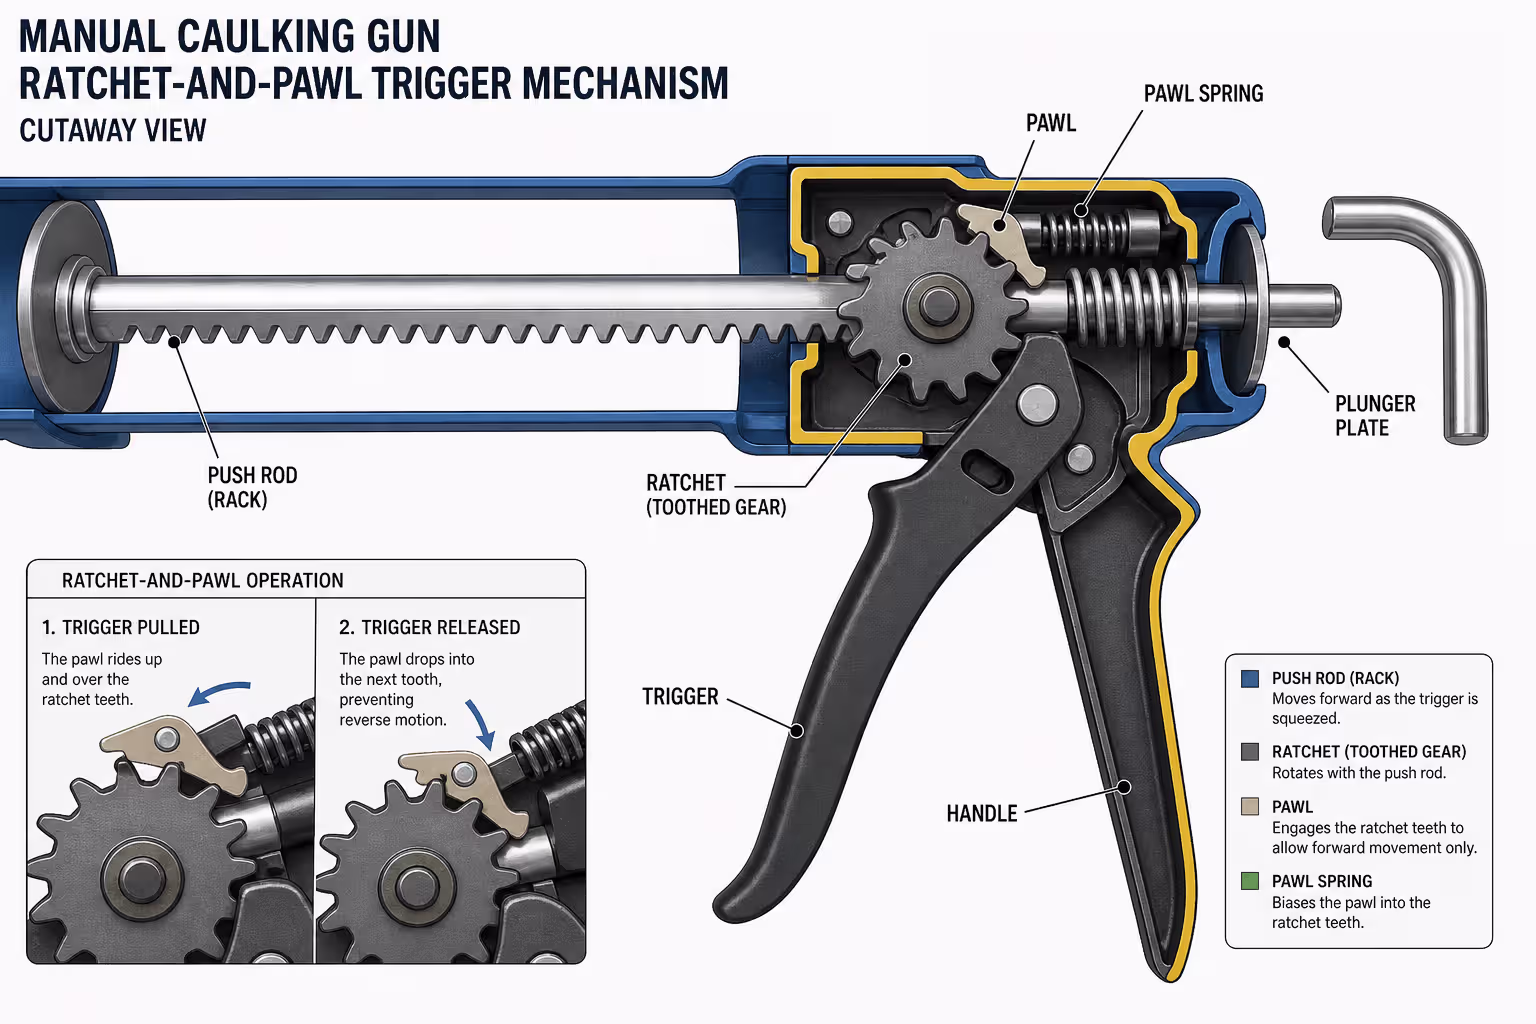
This simple mechanism works reliably — but only when the components are made from durable materials. Budget guns often use soft metal pawls that wear down quickly, or thin frame walls that flex under load and misalign the ratchet teeth. If you are sourcing tools for a crew or distributing to end users, the trigger mechanism is one of the first things to evaluate during sample testing. Caulking guns with reinforced metal frames are less likely to develop trigger mechanism failures under repeated use.
Problem 5: The Plunger Won't Retract or the Gun Is Jammed
You pressed the release lever, but the thrust rod will not slide back. Or the entire mechanism feels locked up and nothing moves. A jammed caulk gun is usually caused by one of three things.
Cause 1 — Sealant has seeped into the rod channel
Over time, small amounts of sealant work their way into the gap between the thrust rod and the barrel. Once this material cures, it bonds the rod to the barrel, making retraction impossible.
Cause 2 — The thrust rod is bent
A bent rod binds against the inside of the barrel. Even a slight bend creates enough friction to prevent smooth movement.
Cause 3 — Worn ratchet teeth
If the ratchet teeth on the thrust rod or the pawl inside the gun are worn down, the mechanism may engage at odd angles and jam.
How to fix it
- For sealant buildup, remove the cartridge and pull the thrust rod all the way forward. Apply a few drops of penetrating oil or silicone spray to the rod and work it back and forth until it moves freely.
- For a bent rod, try straightening it carefully with pliers. If the bend is severe, the rod — and likely the gun — should be replaced.
- For worn ratchet teeth, replacement is the only option.
Regular cleaning after each use prevents most jamming issues. If you are managing tools for a construction crew, setting up a simple end-of-day cleaning routine extends tool life and reduces unexpected replacements mid-project.
How to Prevent Caulking Gun Problems: Maintenance & Best Practices
Most caulking gun failures are preventable. A few minutes of maintenance after each job keeps the tool working reliably for months.
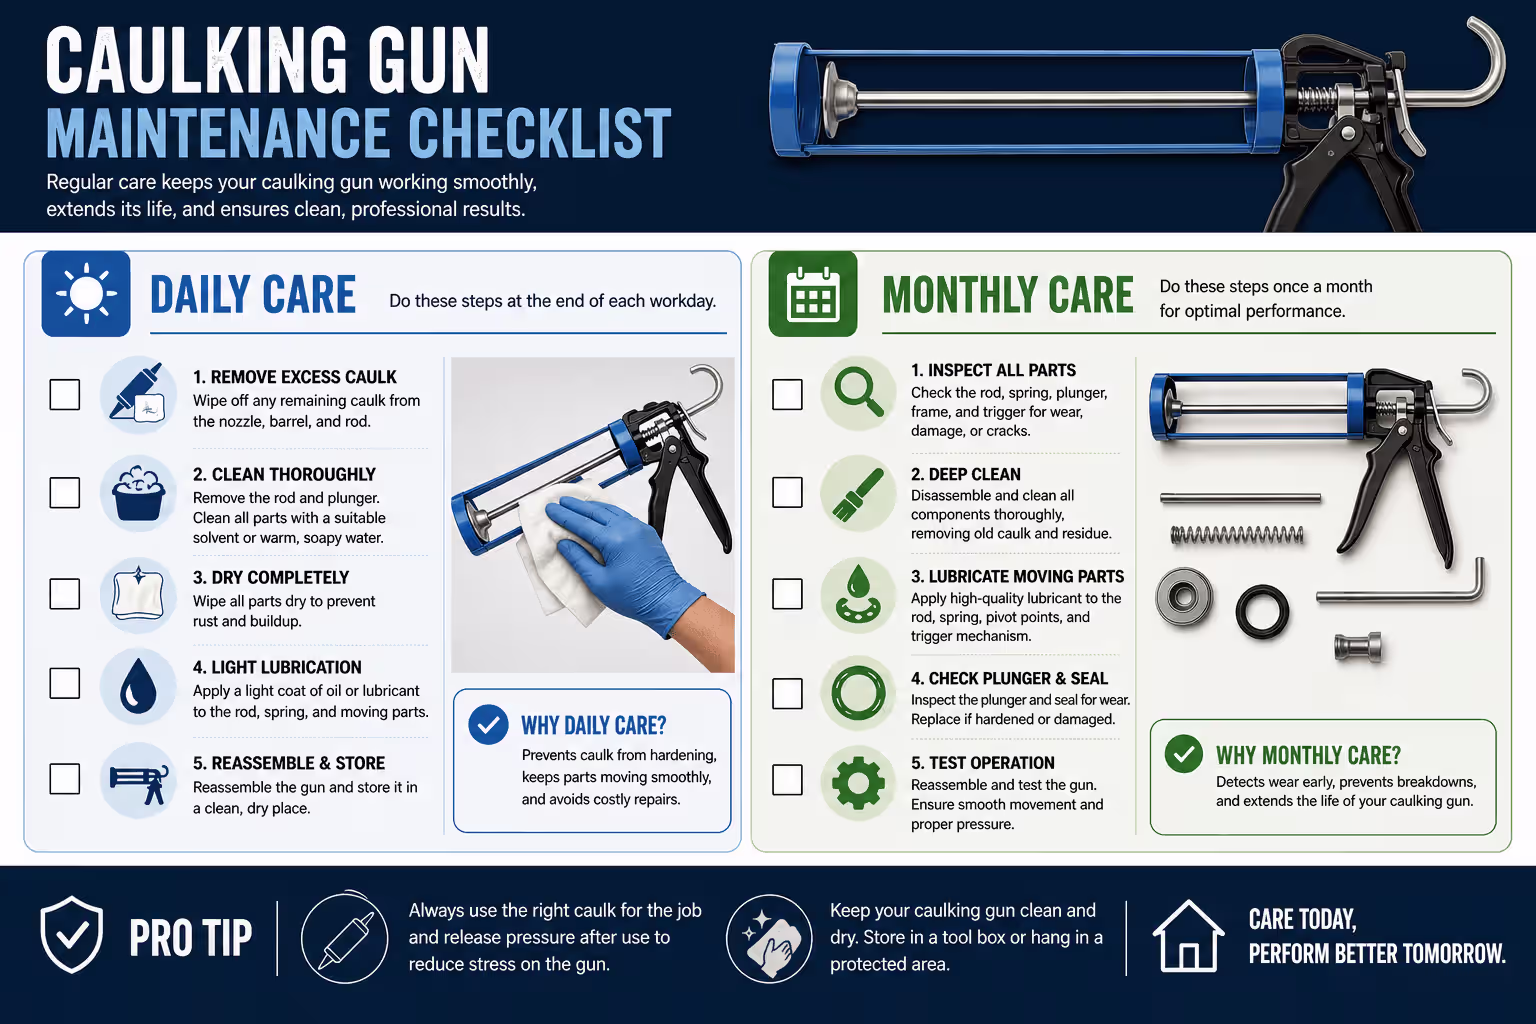
After every use
- Wipe the nozzle tip clean and remove any excess sealant from the barrel
- Pull the thrust rod fully back to release pressure on the cartridge
- If the cartridge is nearly empty, remove it entirely — leaving a near-empty cartridge in the gun accelerates rod corrosion
Storage
- Store the gun in a dry location. Moisture causes rust on steel components, which increases friction and eventually seizes the mechanism
- Avoid leaving the gun in direct sunlight or in a hot vehicle — extreme heat can partially cure sealant inside the cartridge and nozzle
- Hang the gun using the built-in hook if available
Periodic maintenance
- Apply a light machine oil or silicone spray to the thrust rod once a month during active use
- Check the release lever spring and trigger pivot for looseness
- Inspect the frame for cracks, especially near the trigger housing
For a complete guide on loading, handling, and application technique, see our step-by-step caulking gun tutorial.
When to Repair vs. Replace Your Caulking Gun
Not every problem is worth fixing. Here are five signs that it is time to replace your caulking gun rather than repair it:
- The frame is cracked. A cracked frame cannot be reliably repaired and will only get worse under load.
- The thrust rod is bent and will not straighten. A permanently bent rod means constant friction and inconsistent dispensing.
- Multiple components are failing at once. If the trigger is loose, the rod is sticking, and the release lever is stiff, the tool has reached end of life.
- Repairs cost more than a new gun. For budget-tier tools, the cost of replacement parts, if available, often exceeds the price of a new unit.
- The gun is causing recurring problems for your crew. Downtime has a cost. If a crew member spends 15 minutes per shift fighting a faulty gun, that adds up quickly across a project.
For contractors and crews running multiple jobs, the math is straightforward: a mid-range professional caulking gun costs only a few dollars more per unit than a budget option, but can perform more consistently under repeated use. For distributors and wholesalers, end-user complaints about tool reliability directly affect reorder rates and brand reputation — choosing a supply partner that prioritizes build quality can mean fewer returns and better customer retention.
If you are sourcing tools for a crew or looking for a more reliable supply for your customers, CAULKMFG offers reliable caulking guns for construction and trade use with reinforced frames, smooth thrust rods, and ergonomic handles. Contact us to request samples, compare available models, or discuss bulk and OEM supply options.
Frequently Asked Questions About Caulking Gun Problems
Why is my caulking gun not working?
The most common causes are a clogged nozzle, a jammed or bent thrust rod, a cartridge that was loaded incorrectly, or sealant that has expired and cured inside the tube. Start by checking the nozzle for blockages, then verify the inner foil seal behind the nozzle has been punctured. If the rod does not move smoothly, the thrust rod may be bent or the internal mechanism may need lubrication.
Why is my caulk gun so hard to squeeze?
A hard-to-squeeze caulk gun usually has a thrust ratio that is too low for the sealant you are using. For higher-viscosity materials such as polyurethane sealant, butyl, or some construction adhesives, a higher thrust ratio may be needed. Many professional guns use ratios such as 12:1, 18:1, or higher depending on the material. Other causes include a bent or corroded thrust rod, lack of lubrication, or poor ergonomic design.
Why does caulk keep coming out after I stop squeezing?
This happens because standard caulking guns maintain residual pressure on the cartridge after you release the trigger. A dripless or pressure release mechanism can help reduce dripping by slightly retracting the thrust rod when you let go, though effectiveness varies with sealant viscosity and nozzle size. As a temporary workaround, twist the cartridge after each bead to break the sealant flow.
How do I unblock a caulking gun?
To unblock a clogged nozzle, insert a long nail, wire, or thin Allen key into the nozzle opening to push out dried sealant. You can also cut the nozzle tip further back with a utility knife to remove the clogged section. For uncured residue, follow the sealant manufacturer's cleaning instructions — water may help with some water-based products, while mineral spirits may help with some uncured silicone residue. Fully cured silicone usually needs mechanical removal.
Why isn't caulk coming out of the tube?
Check whether the inner foil seal behind the nozzle has been punctured. If it has not, the gun cannot push material through. Also check whether the sealant has expired or cured inside the tube. If the cartridge feels hard and the plunger will not advance, the sealant itself may be the problem rather than the gun.
How long does a caulking gun last?
A well-maintained professional caulking gun can last for a long time under regular use, but lifespan depends on material quality, frequency of use, storage conditions, and maintenance. Budget guns with thin frames and low-quality components may fail faster under daily job-site use. Regular cleaning, lubrication, and proper storage help extend tool life.
Source Reliable Caulking Guns for Construction and Trade Use
If recurring caulking gun problems are affecting your crew's productivity — or your customers' satisfaction — the root cause may be the tool itself rather than how it is being used.
CAULKMFG manufactures manual caulking guns designed for daily construction and trade use. Available model options may include different frame structures, handle designs, and packaging configurations depending on application needs.
Common features across the range include:
- Reinforced frame construction for repeated job-site use
- Smooth thrust rod for stable pressure and dispensing
- Ergonomic trigger and handle design to reduce hand fatigue
- 360° rotating hook for flexible positioning and storage
We supply caulking guns for wholesale, OEM branding, and bulk orders — with custom colors, packaging, and model configurations available for distributors, hardware wholesalers, and construction material suppliers.
Ready to compare options? Explore our caulking guns, request samples to test with your team, or request a quote to discuss bulk pricing, OEM packaging, and supply options for your market.